Homelab
I never planned to build a homelab. I didn’t know anything about self-hosted servers, DNS, or managed switches. I honestly never thought that “networking” would be of interest to me. I viewed all of these as foreign concepts with an insurmountable barrier to entry.
When this started, the hardware in my house consisted of only one no-name mini-pc built on an average processor with an integrated GPU, 32GB RAM, and a 500GB HDD drive. This is the computer I wrote my dissertation on, but it had been sitting in a corner collecting dust ever since I bought an Acer Aspire 3 (which is nothing special, but I got it for a very good price, and it was fine for what I needed at the time).
Even with all of my gaps in knowledge, I did know one thing: I thought Raspberry Pis were cool, and I really wanted to figure out what I could do with one.
I also knew that I hated Apple controlling all of my photos.
Finally, I had the intuition that AI could help break down some of the barriers to entry that were holding me back from learning how to do some cool stuff.
Based on those two interests and one hunch, things started to slowly spin out of control.
The (Initial) Build
In October of 2025, I bought a Raspberry Pi 5 (RPi5) with 8GB of RAM for 82 euros. I also bought the Radxa Penta SATA hat for 59 euros. Finally, I bought 3 WD Red 1TB SSD drives for 84 euros apiece. If you add in some fans and microSD cards, everything I needed to build my first Network Attached Storage (NAS) cost around 400 euros. This is not cheap, but compared to what those components would cost you today, almost exactly a year ago to this day, it is INSANE value. Indeed, if I had not started at that exact time in history, everything else that followed would have likely been far too expensive for me to even consider.
Luckily, it worked out, and I was able to build the NAS. My first post on Reddit was a record of this exact build (r/RASPBERRY_PI_PROJECTS). Additionally, one of the first contributions I made to the community came in the form of a GitHub repo (radxa-pi5-fan-fix) which provides the code for making the Radxa top fan actually work with the RPi5 (it was designed to work with an RPi4).
This is where we get back to AI. One thing about setting up a Raspberry Pi is that it uses Linux. Well guess what? I had never used Linux. I didn’t really know what a kernel was, and I had never flashed an OS on a MicroSD card. And guess what, I don’t think I would have ever been able to do any of that without AI. First, I was using ChatGPT, and eventually I moved on to Claude. These tools not only helped me build the NAS, set up OMV, connect my laptop to the NAS via a networked folder, and build in a regular backup procedure, but they also helped me write all of the code that went into debugging the Radxa fan. I can tell you from the traffic I track on my GitHub page that I get a visitor per day to that page; people have forked it, cloned it, and left me comments. In general I feel like this little bit of software has been pretty helpful to a fair number of people, and it would not have been possible if I hadn’t used AI to solve my problems.
I suppose I will get to my deeper opinions on AI at some later date, but as we start off here, I have to say that I really do not understand people’s negative response to using AI to learn how to do new things (especially Reddit posters). I mean, bookmarking Stack Overflow and copy-pasting to death is not THAT far removed from having a conversation with a chatbot about how to set up Debian for the first time. I know people hate “slop,” but the idea that everything AI produces is slop is a pretty juvenile way to approach this conversation in my opinion.
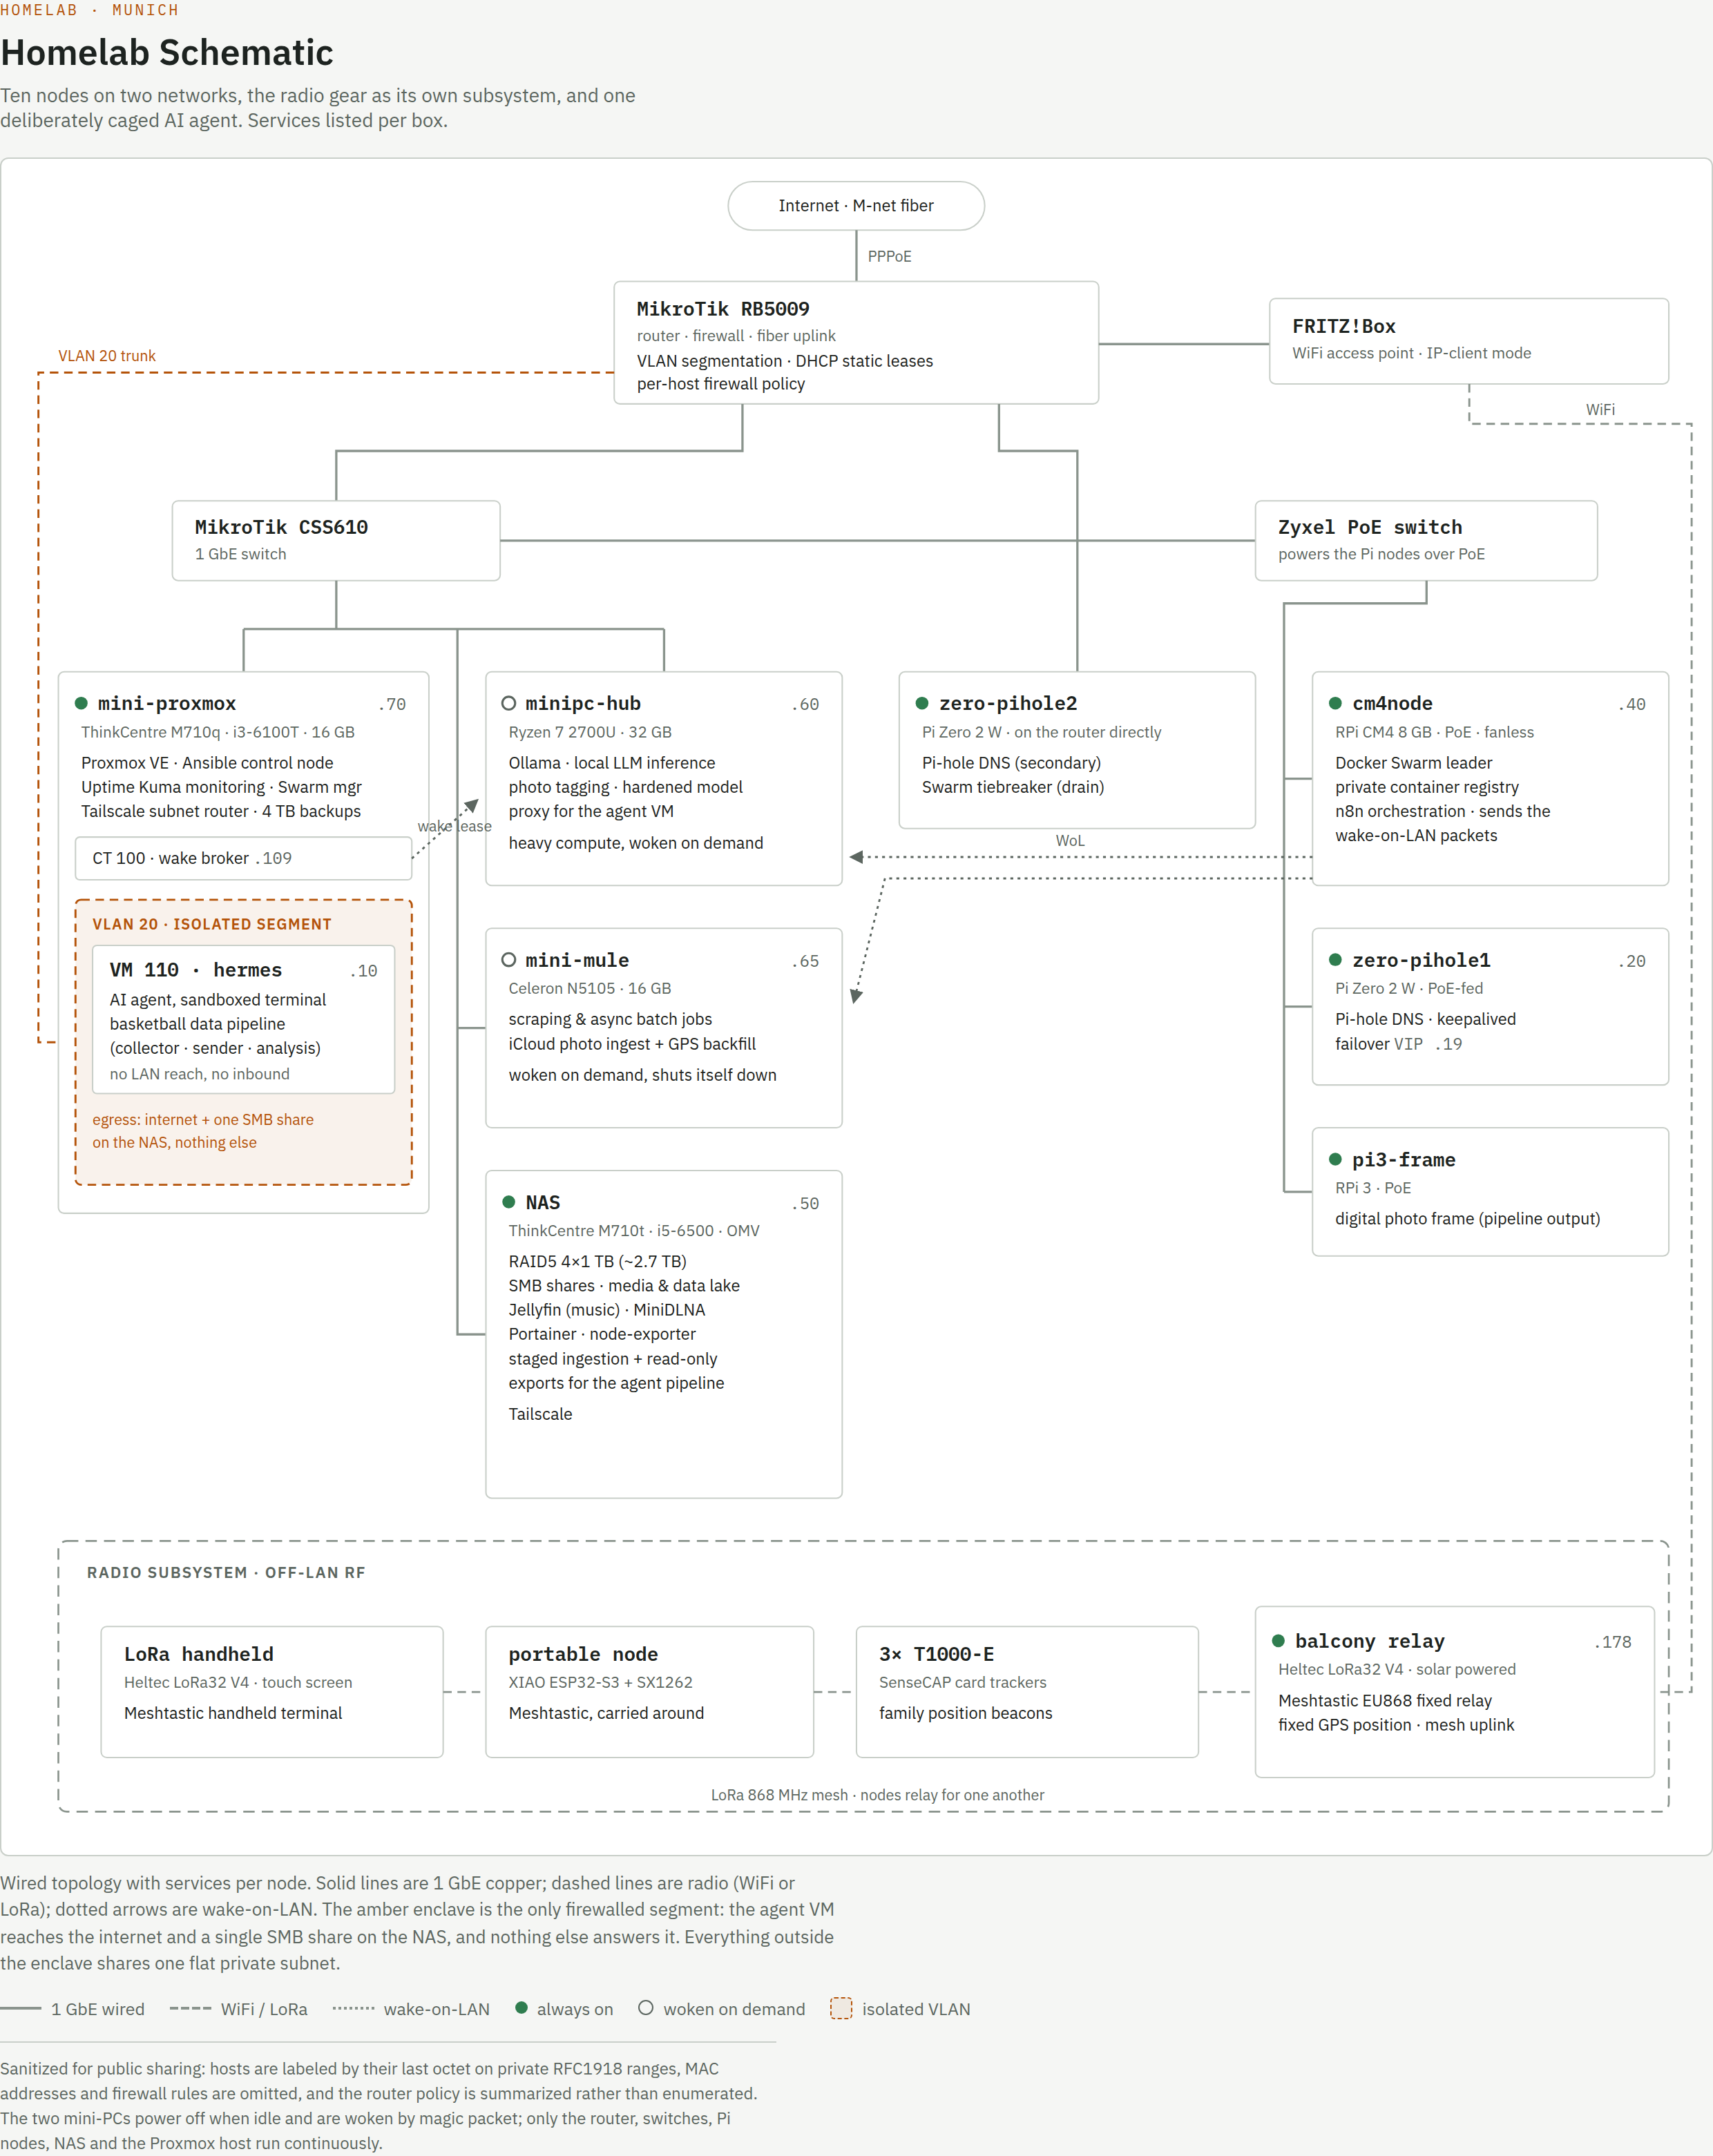
So. Now I had a NAS, an old mini-pc (I named this the HUB since it is my strongest box and it holds all of my LLMs), and my laptop. I also bought an additional mini-pc from eBay for 90 euros solely because it had 16GB of RAM and the price of RAM was exploding at the time (I named this the MULE because it just does work). Together, this was the beginning of my first “compute cluster.”
I won’t go through all of the steps that followed, but this is where it ended up:
Projects
Documentation: One of the things that I am most proud of is my Homelab Vault. When everyone was going crazy about Karpathy’s Second Brain, I figured, hey I can do that too. I had already been keeping notes, especially during the first 3 months when I was trying and failing to get the NAS and the fan to work properly, so the transition to an Obsidian Vault was not a completely foreign concept. I now have over 140 notes, all of which are organized using wiki links pointing at servers, services, or projects. Whenever I need to add context to any conversation with an LLM, I have the Vault and all of the connections between the notes to make sure that the models have the most current information they need to solve whatever problem arises.
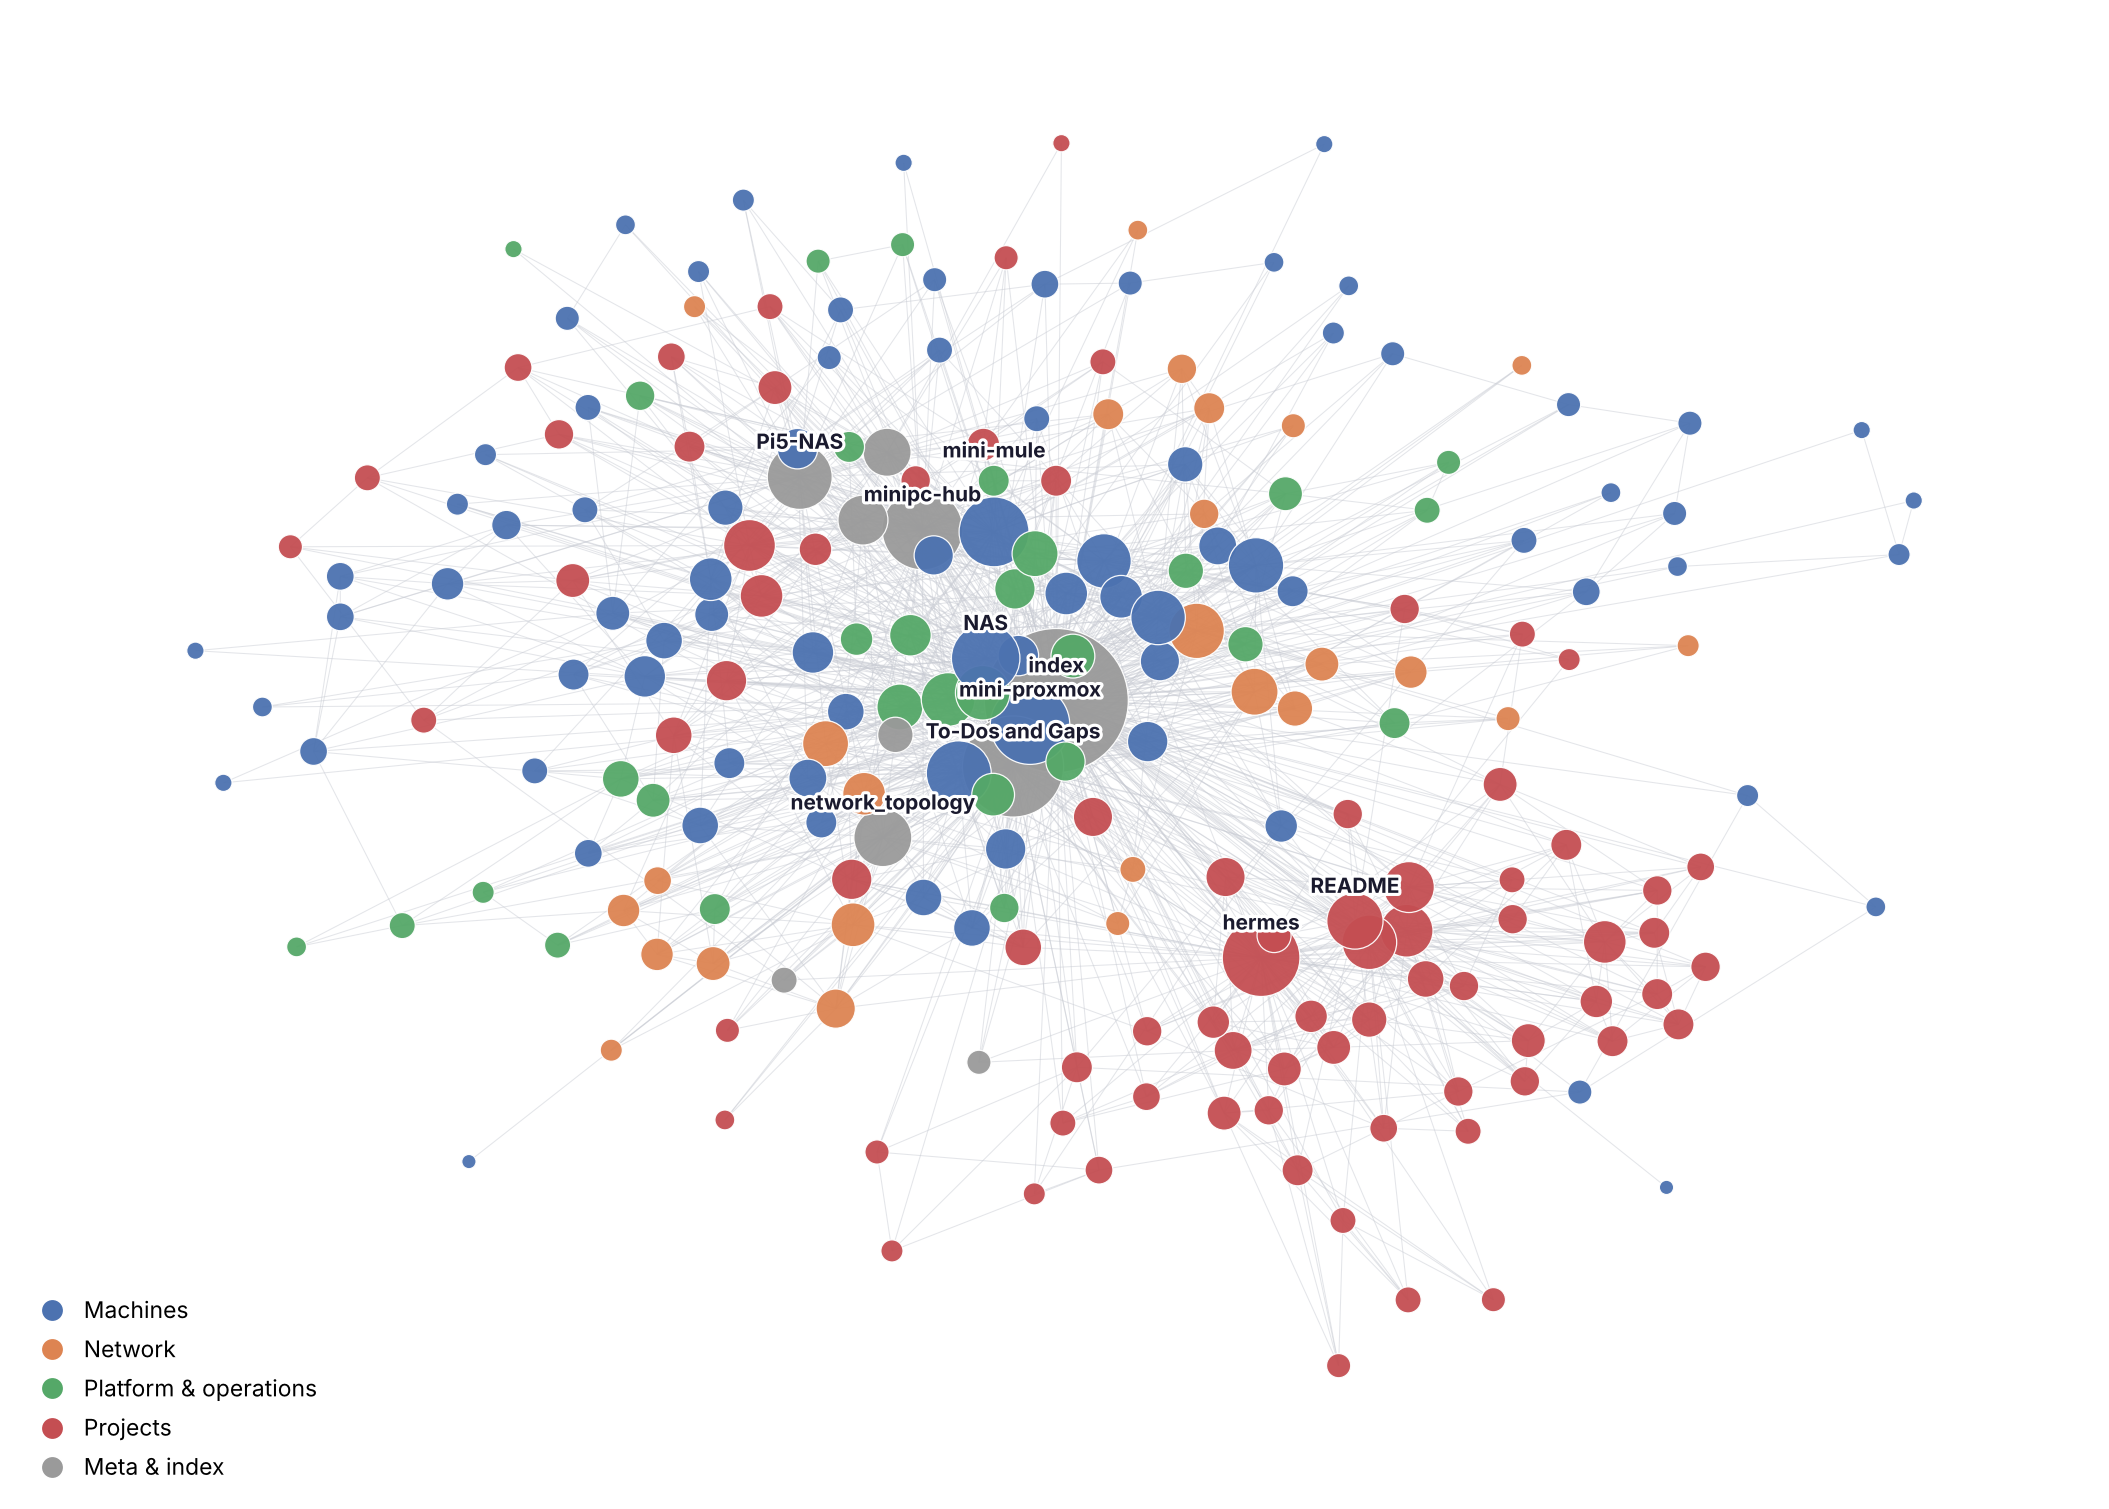
Photo Pipeline: This project gave me the opportunity to work with n8n, and I tried to assign different tasks to different machines. I basically used the MULE to pull down the photos from iCloud; these are then sent to the HUB, where they are tagged using a visual LLM to analyze each photo and record information about its contents; these metadata and the images themselves are then stored in the NAS. This means that if I want to search for only pictures with 3 people in them, I can do that. Or I can search for only beach pictures, or only pictures taken at Christmas time. iCloud still has all of my pictures, but I also have my own copies and these copies are tagged, so I can sort them however I want in the future.
I will not say that this has been an easy process. The pipeline has gone through multiple changes, and what I thought would run once a month now runs every two days, to make sure that the ingestion process is manageable. Although it hasn’t gone as smoothly as I would have liked, the entire point of the homelab is to mess around. So, to that end, this project has served its purpose.
Frame: I have all of my pictures living on the NAS. I needed a way to view them. I bought a Raspberry Pi 3, and I used some code I found online (thedigitalpictureframe.com). Now I have a screen that randomly cycles through photographs every 45 seconds, which means sometimes we get images from the day my son was born in 2015, and sometimes we get vacation pictures from last year. Also, when our anniversary comes around, I can just point the code at that directory, and we can look at wedding photos for a week or so. Practically speaking, this is where the tags from the photo pipeline come in handy, because they allow me to organize the files that I want to be shown on the frame. The benefit of this over a normal E-frame is that I don’t have to deal with any third-party software, and I don’t need a phone app.
German Basketball: This is my current obsession, and it is currently occupying most of my bandwidth. I will not detail it here, because there is a whole section elsewhere on this page (or there soon will be).